Table of Contents
1 Introduction
Android in a glance
Android is developed since 2007 by Google after they bought the self-titled start-up. Based on a Linux kernel, Android is a free platform under GNU GPL2 license. The latest version is version 8 named Oreo. The updates are frequent (twice a year).
Android is a development platform originally designed for mobile devices, but now expanding its market, including TVs or consoles (non-mobile). It is now the leading mobile platform in terms of number of handsets sold.
Application development with Android is mainly in Java (applications, business logic) and XML (for interfaces). It is also possible to develop in C, but by way of specific Java interface.
Desiderata
We are interested now in the Android platform because many companies use mobile platforms to develop business dedicated to internal use by the company, or the access to its services by client applications. Mobile devices have replaced the old fixed terminals for many applications, even in the workplace, especially since the influx of tablet PCs.
Android is of course not the only development platform for mobile devices. We can mention in particular iOS from Apple, and Windows Phone from Microsoft. However, the GPL license and the free tools available to developers is a good reason for choosing Android.
Which development environment?
You're free to use the editor/programming environment of your choice. You must first have the Android development kit (which contains a particular terminal emulator). However, the development in Android Studio is highly recommended.
2 Following the official tutorial
Getting started with Android with the official tutorial
The best way to handle Android is to follow the official tutorial: http://developer.android.com/training/basics/firstapp/index.html. Although not covering all aspects of development under Android this can put a first foot in the stirrup. This will certainly not be sufficient for your needs, this is why we will discuss other aspects later in the lab.
To go further in the discovery of language, you can consult the following sources:
- The official API documentation Android: http://developer.android.com/reference/packages.html
- Official guides describing all the elements of the API: http://developer.android.com/guide/components/index.html
- A Course in French: http://romain.raveaux.free.fr/document/Android/androidcours.pdf
- You can also have a look at the handout.
- Finally, the book's The Busy Coder's Guide to Android Development by Mark Murphy is available at the library in french and online.
Write your first Android application
The official tutorial proposes to develop a first application : HelloWorld. It is only designed to be developed in Android Studio.
Go to the official Android tutorial and read the following sections :
- Creating an Android Project : concerns the handling of Android Studio and the command lines of the development kit.
- Running Your Application : presents how to execute the application on a real device or an emulator.
- Building a Simple User Interface : presents the usage of XML for developing graphical user interfaces (layouts, textfields, buttons, etc.).
- Starting Another Activity : illustrates how an application can manage several activities and link them
Exercise
Follow tutorials 1 to 4 and develop your first app (1h maximum).
3 Retrieving context information
Create an Android context management application
In the remainder of this lab we will develop an Android app to sense the context of an ambient room (with light level sensor, noise level sensor and a light actuator). This idea is to first sense the state of a given room and then to act on it manually. Later on, we will add some automatic context-rule triggers to act on the rooms.
Infrastructure
The ambient computing environment is the following:
- Several rooms (identified by unique
room-id) are equipped with:- Arduino sensors providing light and noise levels
- Arduino actuators to switch on/off lights in rooms
- A context server that:
- stores the data retrieved from sensors
- publishes the state of rooms and allows controlling lights using the following URLs:
http://x.x.x.x:port/api/rooms/lists the rooms in a JSON file (GET request)http://x.x.x.x:port/api/rooms/<room-id>/returns a JSON file with the details of the given room (GET request)http://x.x.x.x:port/api/rooms/<room-id>/switch-light-and-listfor switching on/off the light (PUT or POST request)
A room json file is structured as follows :
{"id":1,"light":{"id":1,"level":20,"status":"ON"},"noise":{"id":1,"level":30,"status":"OFF"}}
As to emulate the context server, without needing to develop and deploy it (it will be done in other labs), we provide a micro web server (based on java mini web server). To deploy it on your computer on port 8083, download the ZIP file, decompress it and execute it using the following command from the directory in which are the JAR and the contents directory:
java -jar test-server.jar 8083
Within this infrastructure, the Android phone will play the role of a monitor and a controller by requesting information on the context server (and not directly the Arduino boards).
Overall architecture of the android application to develop
By following this tutorial, you will develop:
- A java class
RoomContextStatethat encapsulates the state of a room - An Android
Activity, calledContextManagementActivity.javathat manages the interaction with the user by providing the following interface :
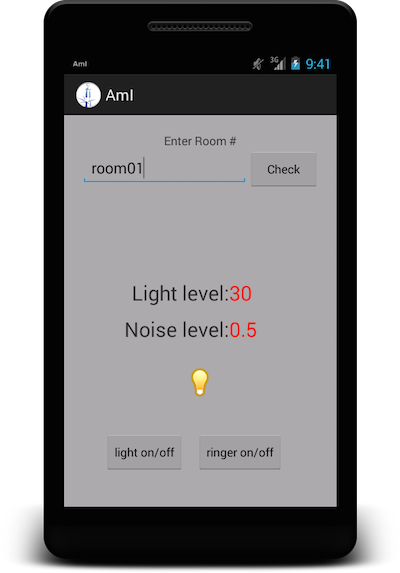
Figure 1: The main activity to monitor and control the ambient environment
- A java class
RoomContextRulethat represents context rules that have to be triggered depending on the state on the room(s). - A
ContextAlarmReceiverclass that regularly senses the context and automatically applies the context rules.
The RoomContextState class and the main activity
First of all, we will create a new Android project.
Exercise
Create a new project with a main activity called ContextManagementActivity. Choose the minimum API 18.
The RoomContextState class
This class is quite simple. It only stores the information corresponding to a room: name (String), status of the light ("on" or "off"), light level (int) and noise level (float).
public class RoomContextState {

    private String room;
    private String status;
    private int light;
    private float noise;

    public RoomContextState(String room, String status, int light, float noise) {
        super();
        this.room = room;
        this.status = status;
        this.light = light;
        this.noise = noise;
    }

    public String getRoom() {
        return this.room;
    }

    public String getStatus() {
        return this.status;
    }

    public int getLight() {
        return this.light;
    }

    public float getNoise() {
        return this.noise;
    }
}
Exercise
Add the RoomContextState class to your project.
The ContextManagementActivity
The main activity of our context management application will be a simple Activity with few views. We will first create the layout and its required resources (icons, strings, etc.) and then focus on the behavior of the app.
Initially, your activity java code should look like this:
public class ContextManagementActivity extends Activity {

    @Override
    protected void onCreate(Bundle savedInstanceState) {
        super.onCreate(savedInstanceState);
        setContentView(R.layout.activity_main);
    }

    @Override
    public boolean onCreateOptionsMenu(Menu menu) {
        // Inflate the menu; this adds items to the action bar if it is present.
        getMenuInflater().inflate(R.menu.main, menu);
        return true;
    }

}
The main layout
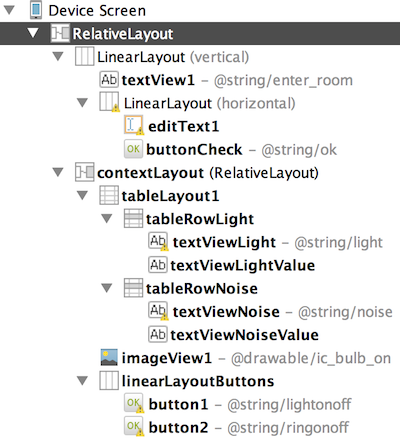
We propose to use the following layout (e.g. context_management_activity.xml) for our main activity. The idea is to have a text edit field to ask for a room, and depending on the room it will display the two values (light and noise), the state off the light (using a bulb image) and two buttons to switch on/off the light and switch on/off the silent mode of the mobile.
Exercise
Download the activity_main.xml file and use it as your activity layout. You will need to define some string values and icons (use Android Studio Wizards to do so). You can use the following icons for light on and light off by copy/paste them into res/drawable-hdpi folder.
Execute your app on the Android emulator to check the layout conformity.
Getting the room id from the EditText view
The first thing to do when a user types a room id into the EditText is to get it into a String value. To do so we need to add an action to the Check button:
((Button) findViewById(R.id.buttonCheck)).setOnClickListener(new View.OnClickListener() {
    public void onClick(View v) {
        room = ((EditText) findViewById(R.id.editText1))
                .getText().toString();
        retrieveRoomContextState(room);
    }
});
Exercise
Add the following code in the onCreate method of your activity. You will need to create a class field named room and a method named retrieveRoomContextState in your activity. For now, keep this method empty.
Retrieving information from the context server
Now our activity is able to ask for a room, and we want to get the context of this room from the context server. As said before, the server is a web server answering HTTP GET requests only. The idea here is to create tasks (AsyncTask) that will send HTTP GET requests to the server for the room that has been typed by the user. To do so we will use the HTTP classes embedded in the Android API.
Setting internet permissions
Before developing the context retriever, since we will use HTTP protocol, we need to set the proper permission to access Internet by adding the following lines in our AndroidManifest.xml file (before <application>):
<uses-permission android:name="android.permission.INTERNET" >
   </uses-permission>
Setting build.gradle to use volley
We will use the volley library to send and read HTTP response files. To use this library, simply add the following line in the dependencies entry of the build.gradle file:
compile 'com.android.volley:volley:1.0.0'
Sending a simple HTTP request
Sending an HTTP request and parsing its result is made very easy with volley.
Exercise
Handle volley simple request following the official tutorial : https://developer.android.com/training/volley/
For testing you should set the CONTEXT_SERVER_URL constant to http://10.0.2.2:8083/. In fact, the IP of the machine executing the Android emulator is 10.0.2.2. You can also use your own context server!
Getting the result of an HTTP request
Sending HTTP GET requests is not sufficient to dialog with our context server. For instance, we need to know the status of the light (switched on/off) to attach the right action to the "switch light on/off" button. To do so we need to analyze the content of the HTTP GET request we send. Actually, the volley framework already provides the result of an HTTP GET request as a String object or a JSONObject, on reception of the server response.
First let us consider we want to extract the status of the light in a room. We can proceed like this:
String url = CONTEXT_SERVER_URL + "/" + room + "/";

//get room sensed context
JsonObjectRequest contextRequest = new JsonObjectRequest
        (Request.Method.GET, url, null, new Response.Listener<JSONObject>() {

            @Override
            public void onResponse(JSONObject response) {
                try {
                    String id = response.getString("id").toString();
                    int lightLevel = Integer.parseInt(response.getJSONObject("light").get("level").toString());
                    String lightStatus = response.getJSONObject("light").get("status").toString();
                    // do something with results...
                    // notify main activity for update...
                } catch (JSONException e) {
                    e.printStackTrace();
                }

            }
        }, new Response.ErrorListener() {

            @Override
            public void onErrorResponse(VolleyError error) {
                // Some error to access URL : Room may not exists...
            }
        });
queue.add(contextRequest);
In the same way we can emit POST request to switch on/off lights (see volley documentation).
Exercise
Create a new class named RoomContextHttpManager using the previous code, by creating at least two methods public void switchLight(RoomContextState state, String room) and public void retrieveRoomContextState(String room). It must encapsulate a RequestQueue, and notify the ContextManagementActivity on reception using a method called public void onUpdate(RoomContextState context), so that it can refresh the view.
Updating the context and the view
In background, the http requests will be performed, and will eventually return a new context state instance using the onUpdate method of the calling activity. Once this instance received, the activity should update the content of its view with the current values and status and display the buttons to act on the room and the phone ringer.
private void updateContextView() {
    if (this.state != null) {
        contextView.setVisibility(View.VISIBLE);
        ((TextView) findViewById(R.id.textViewLightValue)).setText(Integer
                .toString(state.getLightLevel()));
        ((TextView) findViewById(R.id.textViewNoiseValue)).setText(Float
                .toString(state.getNoiseLevel()));
        if (state.getLightStatus().equals(RoomContextState.ON))
            image.setImageResource(R.drawable.ic_bulb_on);
        else
            image.setImageResource(R.drawable.ic_bulb_off);
    } else {
        initView();
    }
}
Exercise
Add the code for the onUpdate and updateContextView methods in your context management activity and test it properly using the mini server. You can now add Toast to signal problems (but you should require adding some methods to your asynchronous tasks and activity).
4 Acting on the environment
Acting on the environment (manually)
We have now a nice view which updates when the user asks for context information for a particular room. We will now add some action to the button. They have already been attached to views (in layout.xml) but still need to be implemented in the activity.
switchLight simply consists in performing HTTP GET request whom path depends on the status of the light in the room. You can remark here we ask for a context update after pressing the button (retrieveRoomContextState) to check the action on the environment.
public void switchLight(View view) {
    roomHttpManager.switchLight(state,room);
    roomHttpManager.retrieveRoomContextState(room);
}
The switch the ringer on/off, we use the AudioManager of the Android OS. But due to recent change in the security policies in Android, we have to care with runtime permission check:
public void switchRinger(View view) {

    NotificationManager notificationManager =
            (NotificationManager) this.getSystemService(Context.NOTIFICATION_SERVICE);

    if (Build.VERSION.SDK_INT >= Build.VERSION_CODES.M
            && !notificationManager.isNotificationPolicyAccessGranted()) {
        Intent intent = new Intent(
                android.provider.Settings
                        .ACTION_NOTIFICATION_POLICY_ACCESS_SETTINGS);
        startActivity(intent);
    }


    AudioManager audioManager = (AudioManager) getSystemService(AUDIO_SERVICE);
    int mode = audioManager.getRingerMode();
    if (mode == AudioManager.RINGER_MODE_SILENT)
        audioManager.setRingerMode(AudioManager.RINGER_MODE_NORMAL);
    else {
        audioManager.setRingerMode(AudioManager.RINGER_MODE_SILENT);
        audioManager.setRingerMode(AudioManager.RINGER_MODE_VIBRATE);
    }
}
You also require to add the following permissions to your manifest file:
<uses-permission android:name="android.permission.ACCESS_NOTIFICATION_POLICY" />
<uses-permission android:name="android.permission.VIBRATE"/>
Exercise
Add these actions to your buttons and test the result using the mini server.
Acting on the environment (automatically)
We have now an application which complete in the sense it both provides way to sense and to act on the environment. However, it should be nice to add some "intelligence" to it, so that decisions to act on the environment are automatic, and do not require pressing a button. As to make it automatic, we will define so called RoomContextRule as action-condition rules. Since we don't exactly know what are all the conditions and all the actions for these rules we will simply define an abstract framework that should be concreted to define rules.
public abstract class RoomContextRule {

    public void apply(RoomContextState context) {
        if (condition(context))
            action();
    }

    protected abstract boolean condition(RoomContextState context);

    protected abstract void action();

}
Moreover, since an application may require several rules, we will store them in an ArrayList named rules. To define a new rule that switch on the silent mode when the noise level is greater than 1.0 (someone is talking in the room) and the light level is greater than 100 (there is light activity), you can simply code the following anonymous instance:
rules.add(new RoomContextRule() {
    @Override
    public void apply(RoomContextState roomContextState) {
        super.apply(roomContextState);
        if (condition(roomContextState))
            display(this + " applies: silent mode switched on!");
    }

    @Override
    protected boolean condition(RoomContextState roomContextState) {
        return roomContextState.getLight() > 100
                && roomContextState.getNoise() > 1.0;
    }

    @Override
    protected void action() {
        ((AudioManager) getApplicationContext().getSystemService(
                Context.AUDIO_SERVICE))
                .setRingerMode(AudioManager.RINGER_MODE_SILENT);
    }

    public String toString() {
        return "Rule 1";
    }
});
Exercise
Create as many rules as you want in your activity (in the onCreate method for instance) and check them all (in the order of definition) each time the context is updated. Test them using the mini server.
Sensing and acting on background (advanced level)
Brilliant! Your application is able to retrieve the context for a given room and apply some context rules to act on the environment automatically. But let us put more "smart" in your application. Why waiting for the user is type in a room id to retrieve the environment? We can easily extend and reuse our code to retrieve automatically the context for each room (as far as we know its id) and then apply automatically the context rules again.
To do so, we will implement a so called BroadcastReceiver class that will receive periodic alarms from an AlarmManager.
We will implement the BroadcastReceiver interface in a class named RoomContextAlarmReceiver. Each time an alarm is sent, this class (in the onReceive method) will launch asynchronous tasks for retrieving the context (as our activity does) and will notify the user using the Notification framework of Android OS each time a rule is triggered, and this for each room of the system.
Retrieving the context
Essentially the context alarm receiver will do the same thing than our activity when receiving an alarm: using a RoomContextHttpManager, triggering the proper rules when receiving the new room context.
However, the RoomContextHttpManager class can inform ContextManagementActivity class and not RoomContextAlarmReceiver. So we need a little bit of refactoring here!
Exercise
- Create a new
RoomContextStateListenerinterface with (at least) anonUpdate(RoomContextState roomContextState)method. - Modify the
RoomContextHttpManagerso that it send results to a list ofRoomContextStateListenerand not aContextManagementActivity. - Modify the
ContextManagementActivityclass so that it now implements theRoomContextStateListenerinterface. - Make your
RoomContextAlarmReceiverimplement theRoomContextStateListenerinterface. - Fix possible compilation errors due to this refactoring.
Notifying the user
Now your task is able to send results to any ContextRetrieverRoomContextStateListener. We will now use the Android notification framework to inform the user of a triggering, since the app is doing this automatically now. We can define the following method that should be called each time a rule is triggered:
private void notify(Context context, RoomContextRule rule, String room) {
    NotificationCompat.Builder mBuilder = new NotificationCompat.Builder(
            context).setSmallIcon(R.drawable.notification_icon)
            .setContentTitle("AmI Context Rule Triggered")
            .setContentText(rule + " is applied for room " + room + "!");
    mBuilder.setContentIntent(null);
    mBuilder.setDefaults(Notification.DEFAULT_SOUND);
    mBuilder.setAutoCancel(true);
    NotificationManager mNotificationManager = (NotificationManager) context
            .getSystemService(Context.NOTIFICATION_SERVICE);
    mNotificationManager.notify(++count, mBuilder.build());
}
Exercise
Add the notify method to the ContexAlarmReceiver class and modify your code so that the user is notify each time a rule is triggered.
Setting up the alarm manager
This alarm manager will emit alarm every 10 seconds to an instance of the class ContextAlarmReceiver:
Intent i = new Intent(this, RoomContextStateAlarmReceiver.class);
PendingIntent pi = PendingIntent.getBroadcast(this, 0, i, 0);
AlarmManager am = (AlarmManager) getSystemService(ALARM_SERVICE);
am.cancel(pi); // cancel any existing alarms
am.setInexactRepeating(AlarmManager.ELAPSED_REALTIME,
        SystemClock.elapsedRealtime() + 10000, 10000, pi);
Exercise
Add this code to your activity and test the automatic triggering and the notifications.
5 Wrap-up discussion
Now you're done with the tutorial! Let us summarize what you have done.
- You have been introduced to Android programming
- You have developed an application capable of retrieving context information from a context server using a dedicated (simplistic) API
- You have extended this application to trigger context rules that may act on the environment (either the phone, or the actuators in the rooms)
- You have extended this application to trigger automatically these rules and thus notify the user
Of course this introductory application has several limitations:
- The context is simple (only few numerical values): we can imagine more complex context representations (cf. AmI course), like using Semantic Web technologies.
- The context server only provides a simple API (e.g. we cannot automatically now the list of all the rooms): this can be extended using a real web server (instead of our mini test server) developed using a real data oriented API using REST or RDF, for instance
- The rules are hardcoded: we can imagine adding a rule-edition activity to help the user design/choose its own rules.
- There is no really context inference, only condition-action: we can add richer context inference engine capable of producing new facts and acting more subtly.
- The rules can be contradictory: a consistency checking could be implemented so that users cannot defined contradictory rules (in their own phone and/or with the other phones), using Semantic Web technologies for instance.
So now, you know what to do next ;)